elizavecca milky piggy carbonated bubble clay mask instructions
Elizavecca’s innovative mask blends clay and carbonation for a deep cleanse. It’s a popular K-beauty staple, known for its unique bubbling action and pore-refining benefits.
What is the Elizavecca Milky Piggy Carbonated Bubble Clay Mask?
Elizavecca Milky Piggy Carbonated Bubble Clay Mask is a unique skincare product originating from South Korea, gaining significant popularity within the K-beauty community. This mask distinguishes itself through its fascinating carbonation process, transforming from a smooth clay texture into a bubbly foam upon application.
The mask’s primary function is deep pore cleansing, effectively removing impurities, excess sebum, and dead skin cells. It’s formulated with carbonated water, which creates the bubbling effect, alongside clay to draw out toxins and refine skin texture. This results in a brighter, smoother, and more revitalized complexion.
Key Ingredients and Their Benefits
Carbonated Water is the star, creating the signature bubbling action that helps lift impurities and cleanse pores deeply. Kaolin Clay gently absorbs excess oil and toxins, refining skin texture without causing excessive dryness.
Charcoal Powder further detoxifies, drawing out dirt and pollutants. Additionally, the mask contains Green Tea Extract, providing antioxidant protection and soothing inflammation. These ingredients work synergistically to deliver a thorough cleanse, leaving skin feeling refreshed, revitalized, and visibly clearer.
Preparing for the Mask Application
Before applying, ensure your skin is clean and dry. A patch test is crucial, and gather a mirror, water, and a soft towel for optimal results.
Skin Type Suitability
The Elizavecca Milky Piggy mask generally suits normal to oily and combination skin types best. Its deep-cleansing action effectively removes impurities and excess sebum, making it ideal for those prone to breakouts or enlarged pores. However, individuals with sensitive or dry skin should exercise caution. The carbonation can be slightly irritating, and the clay may be overly drying.
Those with sensitive skin are strongly advised to perform a thorough patch test before full application. Dry skin types might consider using a hydrating toner or serum before and after the mask to mitigate potential dryness. Always listen to your skin and adjust usage accordingly.
Patch Test Recommendation
Before applying the Elizavecca Milky Piggy mask to your entire face, a patch test is crucial, especially for sensitive skin. Apply a small amount of the mask to a discreet area, such as behind your ear or on your inner forearm. Leave it on for the recommended duration – approximately 5-10 minutes – and then rinse thoroughly.
Observe the area for 24-48 hours for any signs of irritation, redness, itching, or burning. If any adverse reaction occurs, discontinue use immediately. A patch test helps determine your skin’s tolerance and prevents potential widespread irritation.
Gathering Necessary Materials
To prepare for your Elizavecca Milky Piggy experience, assemble a few essential items. You’ll need the mask itself, of course, and a clean facial cleansing brush or your fingertips for application. A bowl of lukewarm water and a soft washcloth are vital for gentle removal.
Having a headband or hair clips handy will keep your hair away from your face. Finally, prepare your favorite moisturizer and toner for the post-mask skincare routine, ensuring your skin stays hydrated and balanced.

Step-by-Step Instructions for Application
Begin with a clean face! Gently apply a medium layer of the clay mask, avoiding the eye and lip areas. Watch for the exciting bubbling transformation to begin!
Step 1: Cleansing Your Face
Prior to applying the Elizavecca Milky Piggy Carbonated Bubble Clay Mask, thoroughly cleanse your face. This crucial first step ensures the mask can effectively draw out impurities and deliver optimal results. Use your preferred gentle cleanser to remove any makeup, dirt, oil, and environmental pollutants.
Pat your skin dry with a soft towel, leaving it slightly damp. A slightly damp canvas allows for smoother mask application and enhanced absorption of the beneficial clay and carbonated ingredients. Avoid harsh scrubbing during cleansing to prevent irritation.
Step 2: Applying the Mask
Using clean, dry fingers or a mask brush, evenly spread a moderate layer of the Elizavecca Milky Piggy Carbonated Bubble Clay Mask onto your face. Avoid the delicate eye and lip areas. A thin layer is sufficient; more doesn’t necessarily equate to better results.
Focus on areas prone to blackheads and enlarged pores, such as the nose and chin. Ensure complete coverage for consistent treatment. Gently smooth the mask across your skin, avoiding vigorous rubbing.
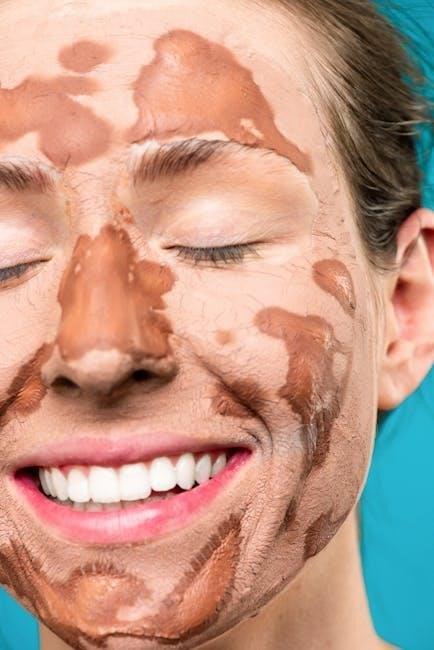
Step 3: Observing the Carbonation
Almost immediately after application, you’ll begin to notice tiny bubbles forming on the skin’s surface. This is the carbonation at work, drawing out impurities from your pores. The bubbling sensation indicates the mask is actively cleansing.
Don’t be alarmed by this fizzing – it’s a normal and desired effect! Observe as the bubbles expand and cover your face, signifying the mask’s deep-cleansing action. Enjoy the unique, slightly tingling experience.
Step 4: The Bubble Formation Process
As the mask sits on your skin, the carbonation intensifies, creating a frothy, bubbly layer. This process isn’t just for show; the bubbles work to lift away dirt, oil, and dead skin cells from deep within the pores.
The bubbles will expand and become more numerous, covering your entire face in a playful foam. This indicates the mask is effectively detoxifying and purifying your complexion. Relax and enjoy the sensation!
Mask Duration and Removal
Allow the mask to bubble for 5-10 minutes. Gently rinse with lukewarm water, massaging in circular motions to further exfoliate and reveal brighter skin.
Optimal Mask Application Time
Determining the ideal duration is crucial for maximizing benefits. Generally, leaving the Elizavecca Milky Piggy mask on for 5 to 10 minutes is recommended. This timeframe allows sufficient carbonation and deep cleansing without excessive drying.
Observe your skin’s reaction. If you experience significant tingling or redness, shorten the application time. For those with sensitive skin, starting with 5 minutes is advisable.
Avoid exceeding 15 minutes, as prolonged use may lead to irritation or discomfort. The bubbling action indicates the mask is working, but doesn’t necessitate a longer duration.
Step 5: Rinsing Off the Mask
Rinsing requires lukewarm water and gentle circular motions. Avoid harsh scrubbing, as this can irritate the skin. The mask should easily wash away, leaving your skin feeling refreshed.
Ensure all traces of the clay are removed, paying attention to the hairline and around the nose. A soft washcloth can aid in thorough removal, but be gentle.
Avoid hot water, as it can strip the skin of its natural oils. Pat your face dry with a clean towel, rather than rubbing.
Step 6: Post-Mask Skincare Routine
Following the mask, replenish moisture is crucial. Begin with a hydrating toner to balance your skin’s pH levels. Next, apply a serum containing ingredients like hyaluronic acid or glycerin for deeper hydration.
Follow with your regular moisturizer to lock in the hydration and create a protective barrier. If using during the day, finish with a broad-spectrum SPF to shield your skin from sun damage.
Avoid harsh actives immediately after, allowing your skin to recover.
Addressing Potential Sensations
A mild tingling sensation is normal due to carbonation. However, discontinue use if excessive redness, burning, or itching occurs; rinse immediately with cool water.
Tingling Sensation Explained
The tingling sensation experienced during the Elizavecca Milky Piggy mask application is a completely normal reaction, directly attributed to the activated carbonation within the clay formula. As the mask interacts with your skin’s natural enzymes, it creates a gentle fizzing effect, releasing tiny bubbles.
This bubbling action helps to lift impurities and unclog pores. The sensation indicates the mask is actively working! However, it shouldn’t be painful or intensely uncomfortable. If the tingling becomes irritating, immediately rinse the mask off with lukewarm water.
What to Do if Irritation Occurs
If you experience any signs of irritation – such as intense burning, redness, swelling, or persistent discomfort – immediately discontinue use of the Elizavecca Milky Piggy mask. Gently rinse your face thoroughly with cool or lukewarm water to remove all traces of the product.
Avoid rubbing vigorously. Apply a soothing, fragrance-free moisturizer to help calm and hydrate the skin. If irritation persists or worsens, consult a dermatologist for further evaluation and guidance.
Frequency of Use
For optimal results, use the Elizavecca Milky Piggy mask 1-2 times per week. Avoid overuse to prevent potential dryness or sensitivity.
Recommended Usage Schedule
To incorporate the Elizavecca Milky Piggy Carbonated Bubble Clay Mask into your routine effectively, begin with twice-weekly applications. This allows your skin to adjust to the mask’s purifying effects. Observe how your skin responds; if dryness occurs, reduce usage to once a week.
Consider alternating with hydrating masks to maintain moisture balance. Consistent, moderate use yields the best results, promoting clearer, brighter skin over time. Avoid using it on consecutive days to prevent over-exfoliation and potential irritation.
Avoiding Overuse
Overusing the Elizavecca Milky Piggy mask can strip your skin of its natural oils, leading to dryness, irritation, and even increased sensitivity. While the bubbling action is satisfying, frequent application disrupts the skin’s protective barrier.
Limit use to a maximum of two to three times per week, and always monitor your skin’s reaction. If you experience any discomfort, reduce frequency or discontinue use altogether. Prioritize hydration and gentle skincare to counteract potential dryness.

Troubleshooting Common Issues
Sometimes, the mask may not bubble effectively or feel overly drying. Adjusting application thickness or ensuring fresh product can resolve these common concerns quickly.
Mask Not Bubbling
If your Elizavecca Milky Piggy mask isn’t bubbling as expected, several factors could be at play. Firstly, ensure the product hasn’t expired, as older masks may lose their carbonating potency. Secondly, application technique matters; a thicker layer generally encourages more robust bubbling.
Additionally, room temperature can influence the reaction – a slightly warmer environment might help. Gently massaging the mask onto the skin initially can also kickstart the carbonation process. If issues persist, verify the product’s authenticity, as counterfeits may lack the key ingredients for bubbling.
Mask Feels Too Drying
If you experience excessive dryness after using the Elizavecca Milky Piggy mask, shorten the application time. Start with just 5-10 minutes, gradually increasing if your skin tolerates it well. Prioritize thorough hydration before applying the mask; a damp skin base helps mitigate dryness.
Following mask removal, immediately apply a rich, hydrating moisturizer to replenish lost moisture. Avoid using the mask on days you’ve exfoliated or are experiencing skin sensitivity. Consider layering a hydrating serum underneath your moisturizer for extra nourishment.
Benefits of Regular Use
Consistent use visibly minimizes pores, brightens complexion, and improves overall skin texture. The carbonated bubbles gently exfoliate, leaving skin feeling smoother and refreshed.
Pore Minimization
The Elizavecca Milky Piggy mask excels at deep pore cleansing. Carbonation lifts away impurities, sebum, and dead skin cells that clog pores, making them appear smaller over time. Clay ingredients further draw out congestion, preventing future breakouts and refining skin texture. Regular application helps to dislodge embedded dirt, resulting in a smoother, more refined appearance. This mask doesn’t just temporarily shrink pores; it actively works to maintain a clearer complexion by addressing the root causes of pore enlargement. Expect a noticeable difference with consistent use, leading to visibly minimized pores and a more even skin tone.
Brightening Effects
Beyond deep cleansing, the Elizavecca Milky Piggy mask contributes to a brighter complexion. Removing dead skin cells and impurities reveals fresher, more radiant skin underneath. The mask’s action promotes cell turnover, diminishing the appearance of dark spots and hyperpigmentation over time. Consistent use can help even out skin tone, leaving a luminous glow. While not a dedicated brightening treatment, the mask’s clarifying effects indirectly enhance skin’s natural radiance. Expect a visible improvement in dullness, resulting in a healthier, more vibrant appearance.
Improved Skin Texture
The Elizavecca Milky Piggy mask noticeably refines skin texture with regular application. By deeply cleansing pores and removing accumulated debris, it minimizes the appearance of roughness and bumps. The carbonated bubbles gently exfoliate, smoothing the skin’s surface. This process helps to diminish the visibility of enlarged pores and create a more even skin texture. Users often report softer, more supple skin after consistent use, enhancing the overall feel and look of their complexion;
Where to Purchase
Find the Elizavecca Milky Piggy mask on the official website and through authorized retailers like Amazon, Ulta, and various K-beauty stores online.
Official Elizavecca Website
Purchasing directly from the Elizavecca website ensures authenticity and often provides access to the full product range, including limited editions or bundled offers not available elsewhere. The website typically features detailed product descriptions, ingredient lists, and usage instructions specifically tailored to each item.
Customers can expect a secure online shopping experience with various payment options and international shipping capabilities. Regularly checking the official site for promotions, discounts, and new product launches is recommended. Direct purchases also support the brand directly, contributing to continued innovation and quality control.
Authorized Retailers
Numerous online and brick-and-mortar retailers carry the Elizavecca Milky Piggy Carbonated Bubble Clay Mask, offering convenient purchasing options. Popular choices include beauty retailers like Ulta, YesStyle, and Amazon, ensuring wider accessibility. However, verifying the retailer’s authorization is crucial to avoid counterfeit products.
Authorized retailers guarantee product authenticity and often participate in promotional events or offer loyalty programs. Checking retailer reviews and comparing prices can help secure the best deal. Always purchase from reputable sources to ensure a genuine Elizavecca experience.

Potential Side Effects
Though generally safe, some users may experience mild redness or itching. Discontinue use if significant irritation occurs, and consult a dermatologist if needed.
Allergic Reactions
While uncommon, allergic reactions to the Elizavecca Milky Piggy Carbonated Bubble Clay Mask are possible, particularly if you have sensitivities to any of the ingredients. Symptoms can range from mild skin irritation, such as redness, itching, or hives, to more severe reactions like swelling, difficulty breathing, or a rash spreading beyond the application area.
If you suspect an allergic reaction, immediately rinse the mask off thoroughly with cool water and discontinue use. Seek medical attention if symptoms are severe or persist. Always perform a patch test before full facial application to assess your skin’s tolerance.
Sensitivity Concerns
Individuals with sensitive skin may experience mild discomfort, like temporary redness or a warming sensation, during or after using the Elizavecca Milky Piggy mask. This is often due to the carbonation and clay drawing out impurities. However, persistent burning, stinging, or excessive dryness indicates potential sensitivity.
To minimize irritation, reduce application time, avoid using the mask on broken or inflamed skin, and follow with a hydrating moisturizer. If sensitivity persists, discontinue use and consult a dermatologist. A patch test is crucial for those prone to reactions.
Comparing to Similar Masks
Bubble masks offer a gentler exfoliation than traditional clay masks. Elizavecca distinguishes itself with its unique pig-shaped packaging and affordable price point.
Clay Masks vs. Bubble Masks
Clay masks, traditionally, deeply cleanse by absorbing excess oil and impurities, offering a more intense detoxifying experience. They can sometimes be drying, particularly for sensitive skin types. Bubble masks, like the Elizavecca Milky Piggy, introduce carbonation, creating a gentler exfoliating action as the bubbles lift away dirt and debris.
This bubbling effect also provides a massaging sensation, improving circulation. While clay masks focus on absorption, bubble masks combine cleansing with a mild, invigorating experience. The carbonation helps to open pores, allowing for a deeper, yet less harsh, cleanse compared to standard clay formulations.
Elizavecca vs. Competitor Brands
Elizavecca’s Milky Piggy stands out due to its affordable price point and effective carbonation. Compared to brands like Origins or GlamGlow, which offer similar clay-based masks, Elizavecca provides a comparable experience at a fraction of the cost. Other bubble masks exist, but often contain higher alcohol content or less natural ingredients.
Many competitors focus on anti-aging or specific skin concerns, while Elizavecca prioritizes deep cleansing and pore care. This makes it a great entry point for those new to clay or bubble masks, offering noticeable results without a premium price tag.
Storage and Shelf Life
Store the mask in a cool, dry place away from direct sunlight. Typically, it has a shelf life of 2-3 years from the manufacturing date.
Proper Storage Conditions
To maintain the efficacy of your Elizavecca Milky Piggy Carbonated Bubble Clay Mask, proper storage is crucial. Avoid exposing the product to direct sunlight, as this can degrade the ingredients and diminish its effectiveness. Keep the jar tightly sealed after each use to prevent air and moisture from entering, which could compromise the formula.
Ideal storage involves a cool, dry environment, away from fluctuating temperatures. A bathroom cabinet, provided it isn’t excessively humid, can work well. Do not store the mask near heat sources or in areas prone to dampness. Following these guidelines will help preserve the mask’s quality and ensure optimal performance with each application.
Determining Expiration Date
Elizavecca products typically feature a manufacturing date printed on the jar, rather than a traditional expiration date. To determine usability, consider a general shelf life of 36 months (3 years) from the date of manufacture. Look for a code that resembles a series of numbers – this indicates when the product was made.
If the jar lacks a clear date, or if the product’s texture or scent has significantly changed, it’s best to discard it. Changes may indicate degradation or contamination. Always prioritize safety and avoid using a product past its prime to prevent potential skin irritation.
Customer Reviews and Testimonials
Users frequently praise the mask’s fun bubbling sensation and noticeable pore-cleansing effects. Some note dryness, while others highlight its effectiveness on oily skin types.
Positive Experiences
Many customers rave about the Elizavecca Milky Piggy mask’s ability to deeply cleanse pores, leaving skin feeling noticeably smoother and refreshed. The unique carbonation provides a spa-like experience, creating a fun and tingling sensation during use. Several reviewers with oily or combination skin report a significant reduction in blackheads and blemishes after consistent use.
Others appreciate how the mask brightens their complexion and improves overall skin texture. The mask is often described as an effective and affordable alternative to professional facial treatments, delivering visible results at home. Numerous testimonials highlight its suitability for a quick and revitalizing skincare routine.
Negative Experiences and Considerations
Some users with sensitive skin have reported experiencing redness or irritation from the mask’s carbonation. A few reviewers noted the mask can be drying, particularly for those with naturally dry skin types, necessitating a thorough moisturizing step afterward. Concerns were raised regarding the strong fragrance, which may not be suitable for individuals sensitive to scents.
Additionally, a small number of customers found the bubbling action to be too intense or uncomfortable. It’s crucial to perform a patch test before full application. While effective for many, results can vary depending on individual skin conditions and concerns.